Post by Bestgamer1 on Dec 19, 2008 23:13:05 GMT -5
There are minor boss spoilers in this game. Feel free to look at your own risk, but you were warned.
This is a part of Subspace Emissary. This stage follows after Galleom's second defeat, and Lucas and Pokemon Trainer, join up with Marth, Meta Knight, and Ike. So they continue along the desert after introductions.
Stage 1: Desert
Characters: Lucas, Pokemon Trainer(all 3), Marth, Meta Knight, Ike
Enemies:
Spikey Goomba: Much similar to Goombas, but with spikes on their head. You can't jump on them, but you can still attack them. Just not the head.
Auroros: These birds fly harmlessly, but if you're under one of them, they will dive bomb you. They will be stuck for a brief moment. During that time, you can pick them up and use them as a projectile. However, watch out when it attacks. It's lethal at high damage.
Roaders: these enemies will charge at you at high speed, or jump over you. The charge attack is more lethal, but easier to avoid, and the jump attack is weaker, but harder to avoid.
Bandinero: These enemies appeared in Wario Land Shake it. There are three types of Bandineros. One is a Red Bandinero. It's like a Goomba, but rather than defeating it when jumped on, it gets stunned. The next is a Yellow Bandinero. It's like a Red Bandinero, but it jumps as well. It gives minor damage though. Other than that, nothing special. The last one is a Blue Bandinero. Rather than walking or jumping, it floats either up and down or left and right. Watch out, some of them may sheild themselves with electricity. When they are not using it, attack them.
Flipstring: These enemies appeared in Wario Land Shake it. They are scorpions and only attack with their tail. However, it does have a sheild breaking capability, so watch out.
Shortfuse: These enemies appeared in Wario Land Shake it. They are practically walking cannons and only fire a spike ball at you. It can be lethal though.
after going through the stage, a cutscene starts.
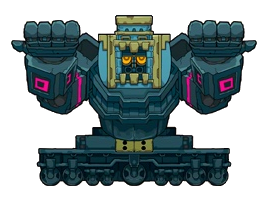
An orange blur speeds by once and again. On the second time, he stops for a moment. It turns out to be Hot Roderick, and challenges you to a race, then drives ahead, and the battle begins.

Name: Hot Roderick
Game: Wario Land Shake It!
Console: Wii
Year: 2008
Attacks:
Wrench Toss: Hot Roderick will toss a wrench behind him. It gives 10% of damage.
Tire Toss: Same as Wrench toss, but there are two tires. One has its rim colored silver. It gives 14% of damage. The other has its rim colored red. It gives 32% of damage.
Rise: This happens when Hot Roderick has half health left. His car will prop up twice, making him more difficult to attack.
Nitro: This also happens when Hot Roderick has half health. He will slow down to get behind you, and start to change his height. When he starts to flash red, be ready to jump. This gives 50% of damage.
Break: When Hot Roderick has 1/3 of his health left, his car will start to break, and he will make a run for it. Be careful, the broken car parts will give 14% of damage and has high knockback.
Description: When you are fighting him, you will be standing on a platform similar to the floating platforms in the Big Blue stage in SSBM. When he starts to throw wrenches at you, either avoid them, or attack them. If you attack them, they will hit Hot Roderick. If three wrenches hit him, his car will start to stop. Get off of the platform and start attacking him. When he gets ready to go again, get back up on the platform. If not, then say goodbye to one of your characters. After he has half of his health left, he will raise his car. Then he will start throwing tires at you. repeat the same process with them as well. Watch out when he slows down. It's very lethal and can instantly KO you if at high damage. When he has 1/3 of his health left, be ready to avoid the broken car parts. When you catch up with him, he only has a steering wheel and is virtually harmless. Banana peels start to appear during this time. When you get one, throw it in front of Hot Roderick and he will trip, leaving him vulnerable. Use the strongest attacks to finish him, or use a trophy stand when his health is low enough. After attacking him enough times, he will be defeated.
Trophy difficulty: Easy
A cutscene starts after defeating Hot Roderick. The group sees an old ruin. Despite it's intimidation, they continue on.
End of Stage
Rewards:
Hot Roderick trophy (In vehicle): Hit all of the tires and wrenches.
Stage 2: Old Ruins
New characters: None
Enemies:
Bandinero: See above
Flipstring: See above
Boomdinero: This enemy appeared in Wario Land Shake It. They will sheild themselves from attacks, in front or behind them. They only fire a spike ball, but it's powerful. It gives 30% of damage. When it gets hit the first time however, it gets stunned. After it has about 10% of its health left, the armor breaks, revealing a Red Bandinero. Use a trophy stand before it breaks to get the trophy.
Pitchfork: This is a Blue Bandinero, but with a fork on its head. You can't jump on it, but you can attack from the sides. If it sees you, it will stop and start to charge at you. If it is hanging on the ceiling, it will drop and try to pierce you when you're below it. Both attacks will give 15% of damage.
Mummer: These enemies are like Shellpods. They only spit poisonous gas at you, which gives 23% of damage and has a 30% chance of poisoning you. After they have 20% of health left, their bandages will fall off, leaving them vulnerable. If left alone long enough, they will put the bandages back on and keep fighting.
Recapitator: These enemies only guard the door in each room. If you attack them while they have their head, they will reanimate. They throw their heads to attack, which give 13% of damage, but when they throw their heads, attack them, and they will be defeated, which gives you access to the next door.
After you progress through the level, a cutscene will start.
The group walks through the ruins until they reach an empty room. Soon after, two hands appear under the wall beside them, and lift the wall up, revealing Rollanratl. The group must now fight him.
Name: Rollanratl
Game: Wario Land Shake It!
Console: Wii
Year: 2008
Attacks:
Head Drop: Steam will start to shoot out of Rollanratl. When that happens, get out of the way and be ready to jump. When Rollanratl drops, he will stun anyone who is on the ground. If he falls on you, it's an instant KO. The earthquake gives 23-33% of damage depending on how far away you are from him.
Force Field: This happens everytime he drops his head. When he is about to go up, he will push you away with a force field prevent further damage to him.
Upgrade 1: This happens when Rollanratl loses 1/3 of his health. His face will close then reopen, revealing blue eyes, rather than yellow eyes.
Pillar drop(lvl 2 only): Rollanratl will start to shake the ceiling, causing pillars to fall down. Red ones will explode, and blue ones will stick in the ground. The red ones give 25% of damage, and the blue ones will give 21% of damage.
Head Drop lvl 2: Same as the first one, but a little faster.
Force Field: Same as before.
Upgrade 2: This one is a little lengthier. Rollanratl will pull out two levers, with two Thwomp-like heads attached. The sides of his head will also fall off and explode, which give 40% of damage. Then, his face will close and open again, revealing red angry eyes, spikes on the sides of his head, and a weak point on top of his head.
Head Drop lvl 3: This is much faster. He may also do it three consecutive times.
Force Field lvl 2: This happens when he takes damage on top of the head rather than rising from the ground.
Rotation: The two thwomp-like heads, begin rotating. You can't hang off of them becuase they have spikes on each side. When they rotate, they will fire lasers, which give 17% of damage. You can stand on them. That way, you can reach Rollanratl's head and attack.
Spike ball: Rollanratl will open his face and drop a spike ball. It gives 27% of damage, and has a sheild breaking capability.
Laser: The extra heads will fire lasers from below them, which give 17% of damage. Note: This and the Spike ball attack is bound to happen at the same time for a few seconds.
Description: Rollanratl will move around for a moment and then drop his head on the ground. When that happens, attack his head, while he's down. He will use a force field to push you away, while he rises back up. when he loses 1/3 of his health, he will upgrade to Level 2. This time, he will start to shake the ceiling, which causes red and blue pillars to drop. When two blue pillars drop, go for the one that is higher, and attack his head. He will then drop his head again. This time, a little faster. The force field is the same. When he loses 2/3 of his health, he will upgrade to Level 3. Note that you cannot hurt him, while he is upgrading. This time, he has more attacks. His head drop is much faster, and harder to anticipate. He may do it 3 consecutive times. When the extra heads start to rotate, get on top of one of them, and jump on Rollanratl's head, and attack the new weak spot. He will use his force field after taking damage. Avoid his other attacks and be ready to attack him again when the extra heads rotate again. Repeat the process until he is defeated.
Trophy difficulty: easy
After Rollanratl is defeated, another cutscene starts. The group finds an exit only to find an empty desert.
End of Stage 2
Rewards: None.
Stage 3: Outside the Old Ruins
Enemies: none
A cutscene will immediately start after starting the stage.
An earthquake starts to happen, and something huge appears. It's Fracktail, and thinks that the group are intruders, so the fight immediately begins.
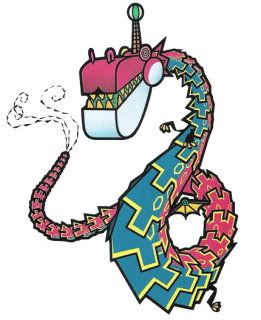
Name: Fracktail
From: Super Paper Mario
Console: Wii
Year: 2007
Desciption: Fracktail will start the battle by rising out of the sand. Then you will see Fracktail head to the background from the foreground. He will then start to move towards you.(He will follow you) However, when he is about to reach his target, he will stop following you ensuring you will get hit. It will give 30% of damage.
Next, Fracktail will appear from the left part of the screen heading right. Then he will turn around trying to chomp you. It will give 50% of damage. It will alert you when he is coming like how a car appears in Onett. Before he hits you, jump over him and you should land on his back. It will then show you on top of Fracktail while he is flying. His antenna is vulnerable to your attacks. He can't attack you while you're on his back, so he relies on Frackles(shown in the image) to attack you. Just one hit will get rid of them. They can't attack you, but a crowd of them can be problems, they will give only 7% of damage. There are three ways you can attack Fracktail.
1. Midair attacks.
2. Tossing items.
3. Tossing Frackles.
After Fracktail takes 1/5 of damage each time, he will somersault. If you happen to fall off, don't worry, you will just have to repeat the process of getting on Fracktail. If you stay on, keep repeating the process until he loses all of his health.
After Fracktail gets defeated, he will crash land into the sand, and this stage ends
Trophy Difficulty: Hard
Rewards: None
End of Stage 3.
Alright, I'm done. Feel free to give some feedback.
This is a part of Subspace Emissary. This stage follows after Galleom's second defeat, and Lucas and Pokemon Trainer, join up with Marth, Meta Knight, and Ike. So they continue along the desert after introductions.
Stage 1: Desert
Characters: Lucas, Pokemon Trainer(all 3), Marth, Meta Knight, Ike
Enemies:
Spikey Goomba: Much similar to Goombas, but with spikes on their head. You can't jump on them, but you can still attack them. Just not the head.
Auroros: These birds fly harmlessly, but if you're under one of them, they will dive bomb you. They will be stuck for a brief moment. During that time, you can pick them up and use them as a projectile. However, watch out when it attacks. It's lethal at high damage.
Roaders: these enemies will charge at you at high speed, or jump over you. The charge attack is more lethal, but easier to avoid, and the jump attack is weaker, but harder to avoid.
Bandinero: These enemies appeared in Wario Land Shake it. There are three types of Bandineros. One is a Red Bandinero. It's like a Goomba, but rather than defeating it when jumped on, it gets stunned. The next is a Yellow Bandinero. It's like a Red Bandinero, but it jumps as well. It gives minor damage though. Other than that, nothing special. The last one is a Blue Bandinero. Rather than walking or jumping, it floats either up and down or left and right. Watch out, some of them may sheild themselves with electricity. When they are not using it, attack them.
Flipstring: These enemies appeared in Wario Land Shake it. They are scorpions and only attack with their tail. However, it does have a sheild breaking capability, so watch out.
Shortfuse: These enemies appeared in Wario Land Shake it. They are practically walking cannons and only fire a spike ball at you. It can be lethal though.
after going through the stage, a cutscene starts.
An orange blur speeds by once and again. On the second time, he stops for a moment. It turns out to be Hot Roderick, and challenges you to a race, then drives ahead, and the battle begins.
Name: Hot Roderick
Game: Wario Land Shake It!
Console: Wii
Year: 2008
Attacks:
Wrench Toss: Hot Roderick will toss a wrench behind him. It gives 10% of damage.
Tire Toss: Same as Wrench toss, but there are two tires. One has its rim colored silver. It gives 14% of damage. The other has its rim colored red. It gives 32% of damage.
Rise: This happens when Hot Roderick has half health left. His car will prop up twice, making him more difficult to attack.
Nitro: This also happens when Hot Roderick has half health. He will slow down to get behind you, and start to change his height. When he starts to flash red, be ready to jump. This gives 50% of damage.
Break: When Hot Roderick has 1/3 of his health left, his car will start to break, and he will make a run for it. Be careful, the broken car parts will give 14% of damage and has high knockback.
Description: When you are fighting him, you will be standing on a platform similar to the floating platforms in the Big Blue stage in SSBM. When he starts to throw wrenches at you, either avoid them, or attack them. If you attack them, they will hit Hot Roderick. If three wrenches hit him, his car will start to stop. Get off of the platform and start attacking him. When he gets ready to go again, get back up on the platform. If not, then say goodbye to one of your characters. After he has half of his health left, he will raise his car. Then he will start throwing tires at you. repeat the same process with them as well. Watch out when he slows down. It's very lethal and can instantly KO you if at high damage. When he has 1/3 of his health left, be ready to avoid the broken car parts. When you catch up with him, he only has a steering wheel and is virtually harmless. Banana peels start to appear during this time. When you get one, throw it in front of Hot Roderick and he will trip, leaving him vulnerable. Use the strongest attacks to finish him, or use a trophy stand when his health is low enough. After attacking him enough times, he will be defeated.
Trophy difficulty: Easy
A cutscene starts after defeating Hot Roderick. The group sees an old ruin. Despite it's intimidation, they continue on.
End of Stage
Rewards:
Hot Roderick trophy (In vehicle): Hit all of the tires and wrenches.
Stage 2: Old Ruins
New characters: None
Enemies:
Bandinero: See above
Flipstring: See above
Boomdinero: This enemy appeared in Wario Land Shake It. They will sheild themselves from attacks, in front or behind them. They only fire a spike ball, but it's powerful. It gives 30% of damage. When it gets hit the first time however, it gets stunned. After it has about 10% of its health left, the armor breaks, revealing a Red Bandinero. Use a trophy stand before it breaks to get the trophy.
Pitchfork: This is a Blue Bandinero, but with a fork on its head. You can't jump on it, but you can attack from the sides. If it sees you, it will stop and start to charge at you. If it is hanging on the ceiling, it will drop and try to pierce you when you're below it. Both attacks will give 15% of damage.
Mummer: These enemies are like Shellpods. They only spit poisonous gas at you, which gives 23% of damage and has a 30% chance of poisoning you. After they have 20% of health left, their bandages will fall off, leaving them vulnerable. If left alone long enough, they will put the bandages back on and keep fighting.
Recapitator: These enemies only guard the door in each room. If you attack them while they have their head, they will reanimate. They throw their heads to attack, which give 13% of damage, but when they throw their heads, attack them, and they will be defeated, which gives you access to the next door.
After you progress through the level, a cutscene will start.
The group walks through the ruins until they reach an empty room. Soon after, two hands appear under the wall beside them, and lift the wall up, revealing Rollanratl. The group must now fight him.
Name: Rollanratl
Game: Wario Land Shake It!
Console: Wii
Year: 2008
Attacks:
Head Drop: Steam will start to shoot out of Rollanratl. When that happens, get out of the way and be ready to jump. When Rollanratl drops, he will stun anyone who is on the ground. If he falls on you, it's an instant KO. The earthquake gives 23-33% of damage depending on how far away you are from him.
Force Field: This happens everytime he drops his head. When he is about to go up, he will push you away with a force field prevent further damage to him.
Upgrade 1: This happens when Rollanratl loses 1/3 of his health. His face will close then reopen, revealing blue eyes, rather than yellow eyes.
Pillar drop(lvl 2 only): Rollanratl will start to shake the ceiling, causing pillars to fall down. Red ones will explode, and blue ones will stick in the ground. The red ones give 25% of damage, and the blue ones will give 21% of damage.
Head Drop lvl 2: Same as the first one, but a little faster.
Force Field: Same as before.
Upgrade 2: This one is a little lengthier. Rollanratl will pull out two levers, with two Thwomp-like heads attached. The sides of his head will also fall off and explode, which give 40% of damage. Then, his face will close and open again, revealing red angry eyes, spikes on the sides of his head, and a weak point on top of his head.
Head Drop lvl 3: This is much faster. He may also do it three consecutive times.
Force Field lvl 2: This happens when he takes damage on top of the head rather than rising from the ground.
Rotation: The two thwomp-like heads, begin rotating. You can't hang off of them becuase they have spikes on each side. When they rotate, they will fire lasers, which give 17% of damage. You can stand on them. That way, you can reach Rollanratl's head and attack.
Spike ball: Rollanratl will open his face and drop a spike ball. It gives 27% of damage, and has a sheild breaking capability.
Laser: The extra heads will fire lasers from below them, which give 17% of damage. Note: This and the Spike ball attack is bound to happen at the same time for a few seconds.
Description: Rollanratl will move around for a moment and then drop his head on the ground. When that happens, attack his head, while he's down. He will use a force field to push you away, while he rises back up. when he loses 1/3 of his health, he will upgrade to Level 2. This time, he will start to shake the ceiling, which causes red and blue pillars to drop. When two blue pillars drop, go for the one that is higher, and attack his head. He will then drop his head again. This time, a little faster. The force field is the same. When he loses 2/3 of his health, he will upgrade to Level 3. Note that you cannot hurt him, while he is upgrading. This time, he has more attacks. His head drop is much faster, and harder to anticipate. He may do it 3 consecutive times. When the extra heads start to rotate, get on top of one of them, and jump on Rollanratl's head, and attack the new weak spot. He will use his force field after taking damage. Avoid his other attacks and be ready to attack him again when the extra heads rotate again. Repeat the process until he is defeated.
Trophy difficulty: easy
After Rollanratl is defeated, another cutscene starts. The group finds an exit only to find an empty desert.
End of Stage 2
Rewards: None.
Stage 3: Outside the Old Ruins
Enemies: none
A cutscene will immediately start after starting the stage.
An earthquake starts to happen, and something huge appears. It's Fracktail, and thinks that the group are intruders, so the fight immediately begins.
Name: Fracktail
From: Super Paper Mario
Console: Wii
Year: 2007
Desciption: Fracktail will start the battle by rising out of the sand. Then you will see Fracktail head to the background from the foreground. He will then start to move towards you.(He will follow you) However, when he is about to reach his target, he will stop following you ensuring you will get hit. It will give 30% of damage.
Next, Fracktail will appear from the left part of the screen heading right. Then he will turn around trying to chomp you. It will give 50% of damage. It will alert you when he is coming like how a car appears in Onett. Before he hits you, jump over him and you should land on his back. It will then show you on top of Fracktail while he is flying. His antenna is vulnerable to your attacks. He can't attack you while you're on his back, so he relies on Frackles(shown in the image) to attack you. Just one hit will get rid of them. They can't attack you, but a crowd of them can be problems, they will give only 7% of damage. There are three ways you can attack Fracktail.
1. Midair attacks.
2. Tossing items.
3. Tossing Frackles.
After Fracktail takes 1/5 of damage each time, he will somersault. If you happen to fall off, don't worry, you will just have to repeat the process of getting on Fracktail. If you stay on, keep repeating the process until he loses all of his health.
After Fracktail gets defeated, he will crash land into the sand, and this stage ends
Trophy Difficulty: Hard
Rewards: None
End of Stage 3.
Alright, I'm done. Feel free to give some feedback.